Web scraping is the process of using programming tools to extract data from a website. It is also a skill that has exploded in relevance in the past couple of decades, as the amount of information amassed on the internet has offered more and more information to businesses, researchers, marketers, and journalists, among many others.
In this article we will look at some of the basic functions offered by Python for web scraping, as well as how to retrieve data via APIs. This is not an exhaustive exploration of the topic (such a thing would take much more than just one article!), only a gentle introduction that should allow you, as a beginner, to get started with getting data from the internet in practice.
Before starting, please be mindful of what data you scrape, from where, and what you wish to do with it. Some websites contain private data, others are subject to copyright. If you wish to retrieve data online beyond the step-by-step examples in this article, please check if you have permission.
While this article is for the beginner, we will assume a minimum level of literacy with Python. You should already know what variables, loops and functions are, for example.
The contents of this article will be organised as follows:
CONTENTS
First Things First: What Libraries Will You Need?
Understanding The Code Of A Web Page
Retrieving Dynamic Data About Flights
With no further ado then, let’s get you scraping the web!
First Things First: What Libraries Will You Need?

As is often the case with a general-use language like Python, performing specialised tasks will require libraries designed specifically for those purposes.
When it comes to scraping data from the internet, there are two different libraries that you should familiarise yourself with. The first is Requests, while the second is Beautiful Soup. We will introduce you to both in greater detail over the course of the article.
We will also be making a marginal use of Pandas, the popular Python library for analysing and manipulating data. You will need Pandas again if you intend to plot, visualize or manipulate the data you scrape, but for the purposes of this particular guide, we will only be using one of its methods.
Understanding The Code Of A Web Page
For those who have been learning Python (and programming in general) for purposes other than web development, let’s start from the absolute basics.
The majority of webpages is composed of code written in three languages: HTML, CSS, and JavaScript. Right now we are interested in getting information primarily from HTML.
The good news is that the HTML code for any given website is incredibly easy to find.
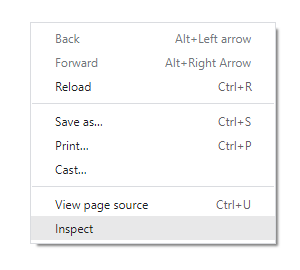
Simply open a webpage, right click with your mouse anywhere within it, and you will open a scroll down menu with a number of options. At the bottom of that menu you will find an option called Inspect. Click on it, and a whole new section will open (either on the right hand side or the bottom of your browser), showing you the code that composes the website.
This newly-opened ‘section’ is called is called the Developer Tools, or DevTools. It is an incredibly powerful resource to explore, analyse and even edit the webpage you are on. Today we will look at only one of the many things that we can do with it: retrieving its HTML code and the information it contains.
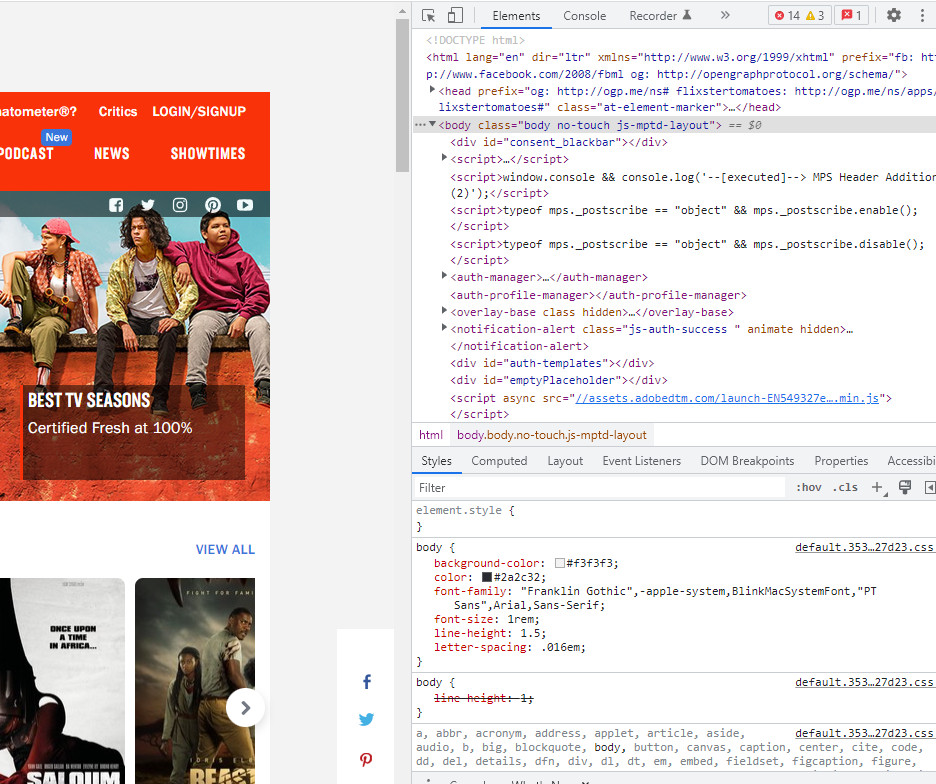
The HTML code of a website is the long script that you will see in the DevTools you just opened (right beneath the title ‘elements’).
Pro tip: If you want to see the code that generates a particular part of the website (for example the specific paragraph of text that you are reading, or an image, or a button), simply highlight that part, right click on it, and click inspect. The section will open at the pertinent line of code, highlighting it for you to see!
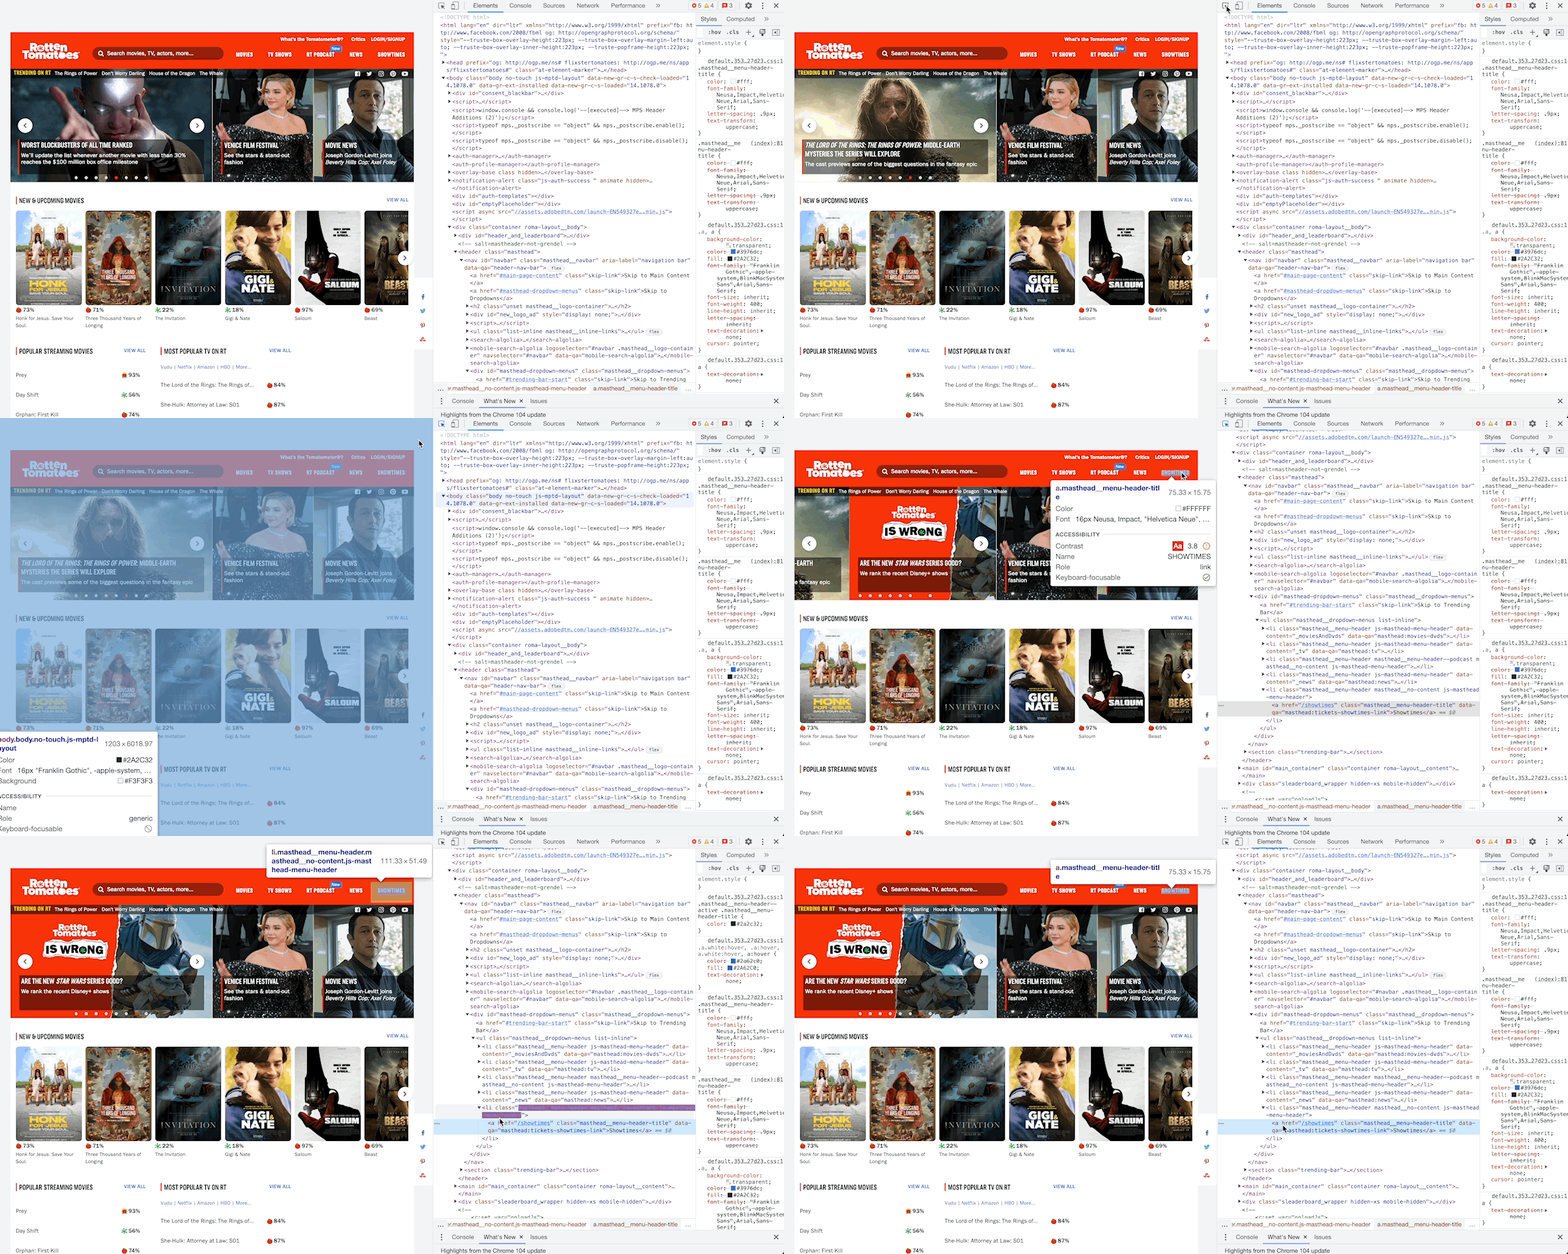
This code that you have revealed contains literally all of the information that is in the page you are visiting. In its raw form, however, it is difficult to read, and even more difficult to use.
This is where Requests comes to our aid.
Getting Started With Requests
It makes sense to start with Requests, as this library involves some basic concepts which we will use again later on.
Requests is one of a number of libraries (alongside httplib, urllib, httplib2, and treq) that can be used to do exactly what this guide is about: retrieve information from web pages, or what in the business is known as web scraping.
How is this done? Open your console and let’s do this together!
First, of course, we import the Requests library.
import requests
Then we use the ‘get’ method from that same library on the URL of a website to get the contents of that website, that is to say, its HTML code. We will store those contents in an object called response, as this is, after all, the response by the website to our request.
response = requests.get('https://www.imdb.com/title/tt0034583/fullcredits/?ref_=tt_ql_cl')
The response object isn’t a simple thing. It contains the retrieved data, as well as a variety of attributes and methods to retrieve it. This means that whenever we want to do anything with it, we can’t just treat it like any old variable – rather, we need to specify which part of it we want to work with. For example:

You can get the same results by writing print(response.content) Just bear in mind that we can’t simply write print(response). This is because the response object in its entirety is more than just readable text, and would therefore return an error if you tried to print it.
You should also know that Request methods can also be written in this syntax:
requests.request(method, url, **kwargs).
This means that our line response = requests.get(‘https://www.imdb.com/title/tt0034583/fullcredits/?ref_=tt_ql_cl) could also have been written like this:
response = requests.request('get', 'https://www.imdb.com/title/tt0034583/fullcredits/?ref_=tt_ql_cl')
Now that we have converted all of the contents of a website into a response object, we can do all sorts of things with it.
For a complete list of all the methods that you can use with Requests, check out the official documentation.
Put Beautiful Soup To Use
Once you have an HTML response object on your Python console, it’s time to work with it. The library Beautiful Soup exists to let you pull data out of HTML and XML files, and is perfectly suitable for our purposes. So how do we use it?
Once again, let’s do this step by step. First of all, import the library Beautiful Soup into your Python script.
from bs4 import BeautifulSoup
We will then use the method html.parser, which is Python’s in-built parser, to turn our response object into something that Python can work with. We will use it on the HTML code we have scraped and put the result into a new variable, which here we will call soup.
soup = BeautifulSoup(response.text, 'html.parser')
What can we do with this ‘soup’? Let’s have a look.
HTML code is composed of tags, which are pairs of letters or words that wrap up each item of content on a web page, and which are contained by the symbols <> and </>. Thus, a paragraph of text on a webpage will be indicated by the letter p and written like so:
<p>This is a paragraph.</p>
With this in mind, we can explore the contents of a web page simply by asking Python to show us its appropriate HTML tags:
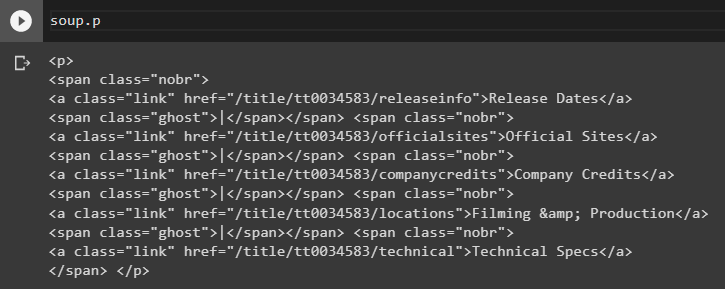

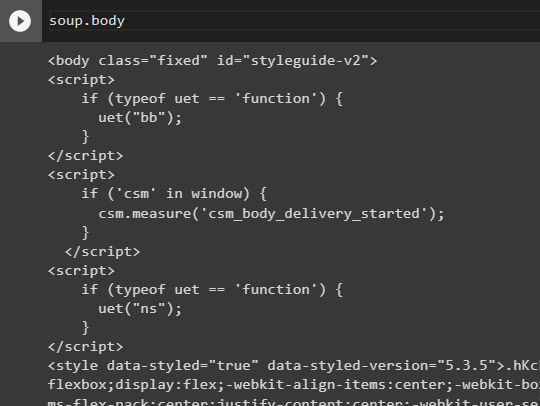
You can explore tags in greater depth by concatenating them in the same command.


A more practical way to explore this code is to use methods built specifically for that purpose. For example:
soup.find("p")
This will only return the first element of its type that it finds, so in this case the first paragraph.
soup.find_all("p")
This will return all the elements of this type, so in this case all paragraphs.
Another option instead of .find_all() is to use .select(), which will locate all the elements of a CSS class, and – importantly – return them as a list.
Note that .select() requires an uncommon syntax to be used. It lets you conveniently find tags within other tags, but you must call them both within the same inverted commas (as though they were both parts of a string), and surprisingly, you don’t have to separate them with a comma. Meanwhile, different attributes that are part of the same tag (for example, a CSS class) are separated by full stops!
This means that for an HTML code that looks like this…
<div class="parent">
<h3 itemprop="name">
<a href="/title/tt0034583/?ref_=ttfc_fc_tt"
itemprop='url'>Casablanca</a>
…the way one asks Python to find all the <a> beneath the <div> tags that contain a class called “parent” is this:
soup.select("div.parent a")
See what’s happening there? ‘Parent’ is a class within the tag called ‘div’, so we call that div.parent. At the same time, a is the tag within the higher tag div, so we divide that from ‘title.movies’ with just a blank space, and we also wrap up both the div and the a within the same inverted commas.
This can be confusing for the beginner at first, but you’ll get used to it with practice!
A particularly common and useful method is get_text, which – as the name suggests – will return the parts of a webpage that are actually meant to be read.

You can combine all of these methods with regular Python loops to explore and manipulate the HTML code app your leisure.
for p in soup:
print(soup.p.get_text())
It then becomes relatively simple to write Python functions that let you repeat particular tasks on different pages of the same website, as long as those pages are structurally similar. A function that lets me print the names of all the actors in the IMDB cast page of Casablanca should do the same for the cast page of The Godfather.
Web Scraping With APIs
We’ve looked at some of the basic methods to take data from the internet and put it into your Python console so you can work with it. Let’s now look at something just a little more complex.
Web scraping is generally easier the more static the data you are working with is. A function that takes the name of a city and returns its latitude and longitude based on its Wikipedia page is relatively easy to build, for example, because neither the coordinates nor the website displaying them will change. To whit, you just get the function to create a soup based on its url as an f_string…
city = "Berlin"
html = requests.get(f"https://en.wikipedia.org/wiki/{city}")
soup = BeautifulSoup(html.text, 'html.parser')
…then you identify which tags within the HTML code contain the coordinates, extract them with .find() or .select(), and get the function to return those. In this case the relevant tag is called span, and its CSS classes are latitude and longitude respectively.
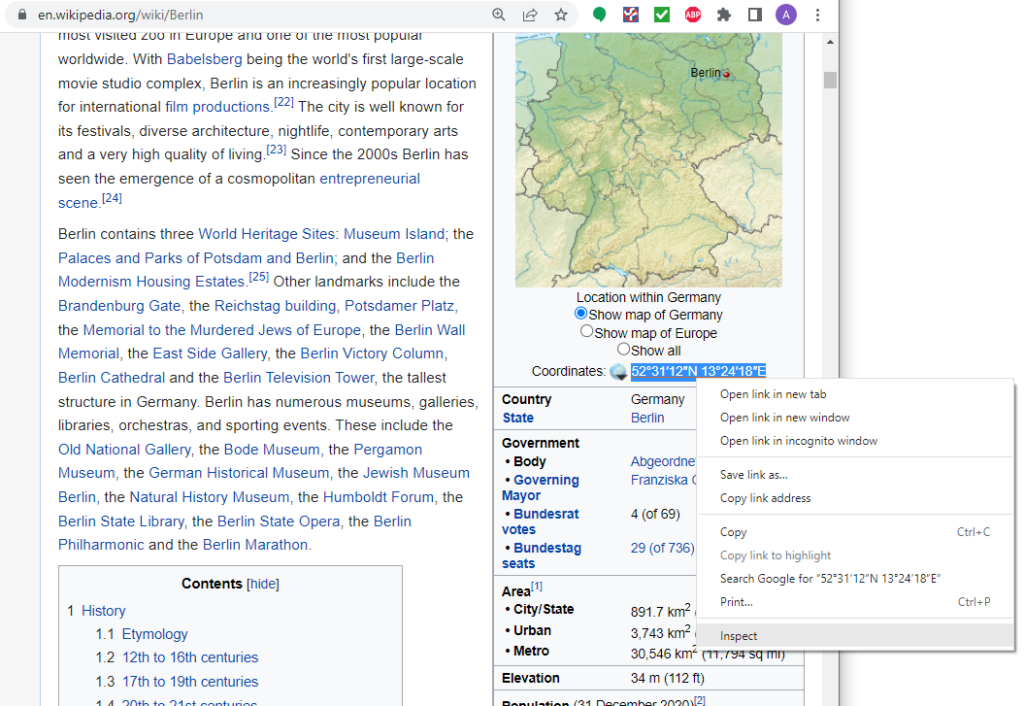
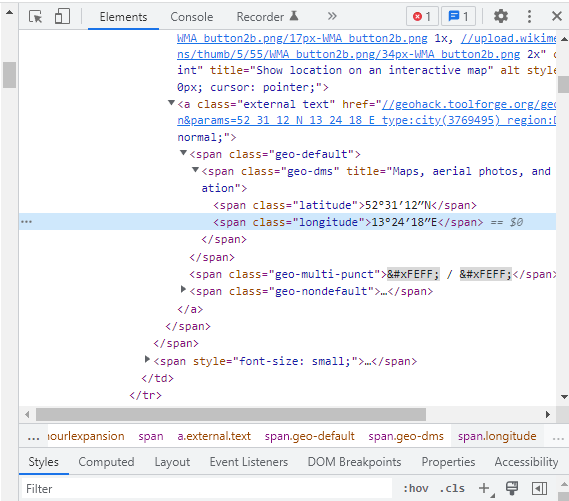
Therefore:
latitude = soup.select("span.latitude")
longitude = soup.select("span.longitude")
print(f"For {city}, the longitude is " + longitude[0].get_text()
+ " and the latitude is " + latitude[0].get_text())
Done and done!
However, things get a lot trickier when you want to use Python to handle data that is constantly changing.
Suppose, for instance, that you wanted to create a function that checks the results for matches played in a particular football league. Now you are dealing with results that are changing all the time, and the web pages showing these results will change accordingly. How can we do this?
Skilled data scientists are able to write complex, flexible code that can investigate dynamic queries using a combination of different web resources. But beginners won’t have to go that far.
For the most popular queries related to dynamic data – including things like the results of football games – there already exist online resources that do the work of storing and updating that data regularly. These resources aren’t always fully-fledged websites – they may be something as simple as APIs.
An API, or Application Programming Interface, is simply the code that websites use to request data from each other. APIs are made up of routes, and actually consist of pretty simple code. You can see an example of an API simply by looking at the URL of any given website – that URL is, precisely, the API that tells your browser where to go!
For example, here is the API for a YouTube video:
https://www.youtube.com/watch?v=dQw4w9WgXcQ
And here’s what this is doing:
- https:/ – This tells the program what transmission protocol to use, in this case HTTPS.
- /www.youtube.com – This tells the program which website to look in.
- /watch?v=dQw4w9WgXcQ – This requests the video whose ID is dQw4w9WgXcQ.
When learning web-scraping, you will want to find out how to work with APIs and where to find them. One extremely useful hub for this purpose is RapidAPI, which collects the APIs of websites storing dynamically updated data.
RapidAPI provides a wealth of API keys which respond directly to your requests – in our example above, their API key would return the updated results of football matches, which you can then explore and manipulate as code. Some of the more popular resources on RapidAPI provide information about things like the weather, transport, and finance, which of course are changing all the time.
Let’s look at how to take one of their API keys and turn it into information that Python can use.
Retrieving Dynamic Data About Flights
In this example, we will create a simple dataframe out of an API key which will allow us to query information about airports world-wide.
Firstly, you will have to create an account on RapidAPI. As long as you’re just practising, choose the free subscription. Be aware that this will limit your number of API requests to 200 per month.
Then, navigate to their page listing the APIs for flight data. A variety of options is available, but we will select AeroDataBox for our example.
In the AeroDataBox window, on the left, you will get the option to look for data about flights, airports, and aircraft, among others. Let’s select Airport APIs, then from the scroll-down options, Search airports by free text.
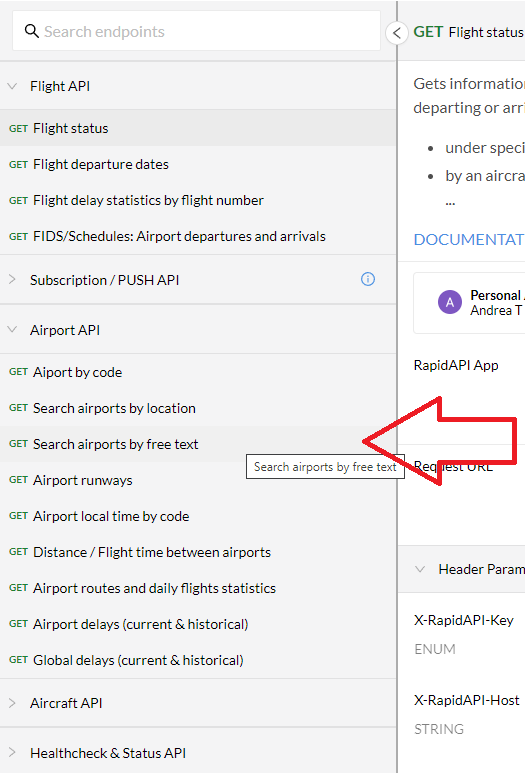
Then, on the right, select Python > requests from the drop down options to get a request code that is already formatted for the language you are using.
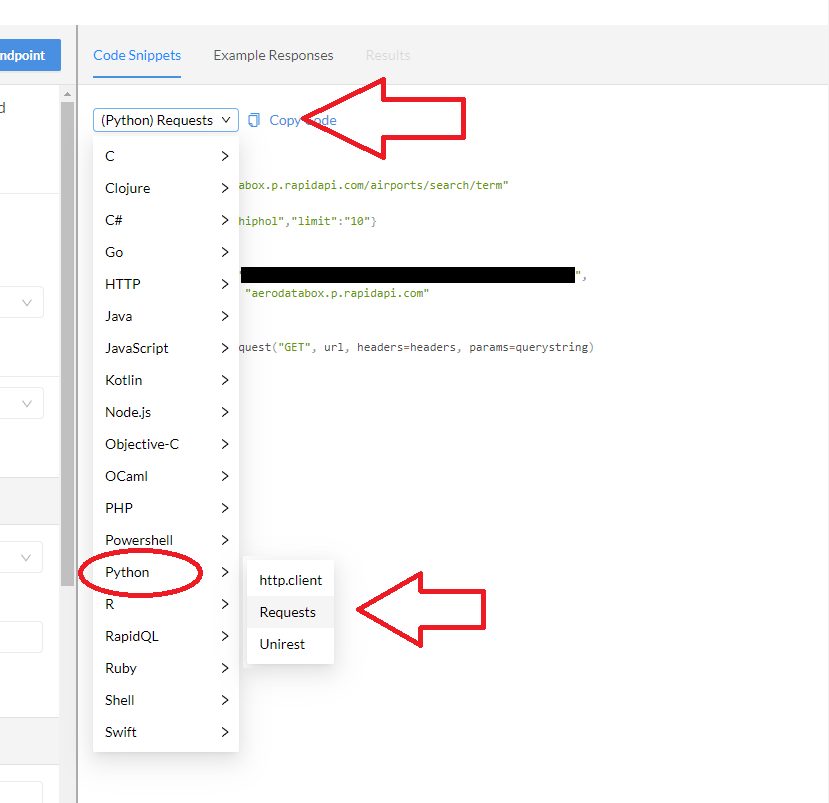
You should get something like this (obviously my API key here has been blacked out!), and you can just copy the whole thing directly into your console:
import requests
url = "https://aerodatabox.p.rapidapi.com/airports/search/term"
querystring = {"q":"Berlin","limit":"10"}
headers = {
"X-RapidAPI-Key": "XXXXXXXXXXXXXXXXXXXXXXXXXXXXXXXXXXXX",
"X-RapidAPI-Host": "aerodatabox.p.rapidapi.com"
}
response = requests.request("GET", url, headers=headers, params=querystring)
print(response.text)
An important note: the response objects that you get from these APIs will not come in an HTML format, like the examples we have used above. Instead, they will come in JSON format, which is made for storing and transforming data.
For this reason, if you want to give your data a look with your own eyes, you will want to use the Request method .json(), which will make that data readable for us. In the example above, just add response.json() at the bottom of your code.
Now that we have the data, let’s call the Pandas library to our aid and perform a little act of magic.
import Pandas as pd
We will create an entire dataframe by adding this little pandas method at the bottom of the code given to us by RapidAPI:
pd.json_normalize(response.json()['items'])
Marvel at the beautiful simplicity of this! The json_normalize() method from Pandas turns JSON contents (in this case our response objects) into a dataframe for whichever tag you choose to specify. In case you’re wondering why we chose ‘items’, just take a look at the contents of response.json().
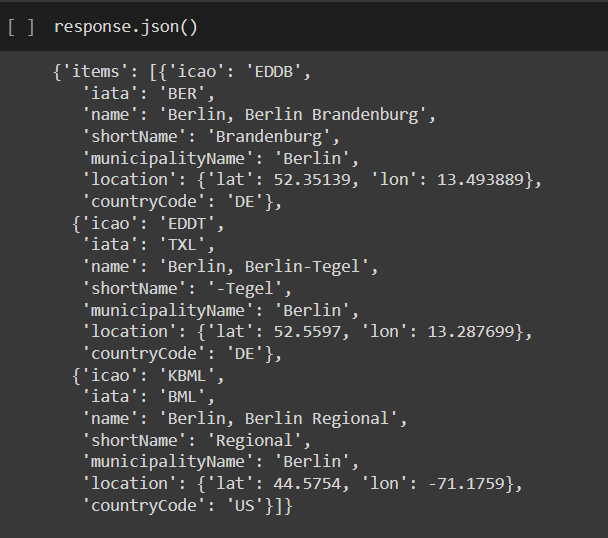
As you can see, the response object contains three dictionaries, contained within a list, all wrapped up in another dictionary that has just one key – items. When using .json_normalize(), we therefore need to specify that we want to create our columns out of the stuff that is inside of ‘items’.
In any case, now you have a table which lets you query information about airports worldwide. Typing ‘Berlin’ in the querystring, for example, gives you a table with all the airports in Berlin – try amending that to ‘London’ to see some funny results, as the program brings in airports in USA locations that are also called ‘London’! You can also search for airports by their names, or by their ICAO and IATA codes. Moreover, this new table is flexible and easy to amend.
A final note – you may notice that if the querystring is amended to search by country code or location coordinates, it doesn’t work. For the country code, this has to do with the fact that countries are not directly linked to individual airports in this API. For location coordinates, look again at response.json(). You’ll notice that the key ‘location’ contains a dictionary of its own, in which latitude and longitude are kept separate. The way to access them therefore requires you to specify first the greater dictionary key, then the position in the list, and finally the key of the internal dictionary:
response.json()["items"][0]["location"]
In sum, you have now retrieved data from an API and put it into your console for your use and your leisure. Other APIs, particularly those that contain time-sensitive data, will require some more sophisticated tinkering to return dynamically updated results – for instance the use of the library datetime to let the program automatically update the desired time of the operation. Discussing these case studies would take us into the next level of complexity, and therefore beyond the scope of this basic introduction.
Conclusion: The Next Steps

In this guide, we have introduced you to the basics of using Beautiful Soup and Requests, and one particular use of Pandas that can make your life easier. As you get busy scraping data by yourself, you will probably need to use all of these libraries more extensively.
To make that easier for you, we will end this article with a few resources to help guide you on your next steps. Here is a detailed and beginner-friendly guide for using Beautiful Soup, and here is a similar guide for Requests.
You may also want to go deeper with Rapid API, in which case here is a link to their official documentation. They also have a page dedicated specifically to guides, which is fun if you want to explore what can be done with their website (although many of the examples there won’t be so beginner-friendly).
Finally, if you truly are committed to learning Python for Data Science in depth, you could always consider our bootcamp, which covers – among many other things – how to set up an automated data pipeline on the cloud, so that your programs can collect data all by themselves!
This was a beginner guide, but if you keep learning the way you did by reading this article, you will not be a beginner for long. Now go forth and conquer the internet!


